Abstract
The application of deep learning models to real world problems has been growing exponentially over the past several years. The widespread availability of NVIDIA GPUs, packages such as Tensorflow and Keras, and large online data sets has democratized this technology and ignited interest among developers, analysts, data scientists, and others looking to leverage the power that deep learning offers.
However, setting up a functional and effective deep learning environment can be challenging for a number of reasons. First, there are several moving parts and versions of the various software components must be compatible with one another. As new editions are released, configuration instructions that worked several months ago may no longer be viable. Also, searching the Web for help will return instructions that take differing (and sometimes incorrect) approaches – adding further confusion.
The objective of this post is to provide a rock-solid Ubuntu configuration that is anchored to the most current GPU-based version of Tensorflow – to get your deep learning environment up and running quickly and painlessly.
Note: This installation has been tested on both an AWS p2.xlarge instance as well as one of my personal Intel-based PCs.
Prerequisites
- Ubuntu 16.04 x86_64
- NVIDIA GPU with a Compute Capability of 3.0 or higher (see https://developer.nvidia.com/cuda-gpus for a list of supported GPUs)
- An Internet connection
Stack
We’re going to build out an Anaconda environment that leverages the Keras library on top of the latest version of Tensorflow (1.4 for Python 3.6 at the time of this writing) with full GPU support to maximize performance.
Tensorflow 1.4 GPU, in turn, requires :
- NVIDIA CUDA® Toolkit 8.0
- NVIDIA drivers associated with CUDA Toolkit 8.0
- NVIDIA CUDA® Deep Neural Network library (cudNN) v6.0
- GPU with CUDA Compute Capability 3.0 or higher (as stated above)
Procedure
Open a terminal or SSH into your running Ubuntu instance.
Remove any existing NVIDIA components
sudo apt-get purge 'nvidia-*'
Update and install needed packages
sudo apt-get update
sudo apt-get install gcc make g++ build-essential
sudo apt-get upgrade
Download Anaconda and NVIDIA software
mkdir Downloads
cd Downloads
wget "https://repo.continuum.io/archive/Anaconda3-5.0.1-Linux-x86_64.sh" -O "Anaconda3-5.0.1-Linux-x86_64.sh"
chmod +x Anaconda3-5.0.1-Linux-x86_64.sh
wget "https://developer.nvidia.com/compute/cuda/8.0/Prod2/local_installers/cuda-repo-ubuntu1604-8-0-local-ga2_8.0.61-1_amd64-deb" -O "cuda-repo-ubuntu1604-8-0-local-ga2_8.0.61-1_amd64-deb"
wget "https://developer.nvidia.com/compute/cuda/8.0/Prod2/patches/2/cuda-repo-ubuntu1604-8-0-local-cublas-performance-update_8.0.61-1_amd64-deb" -O "cuda-repo-ubuntu1604-8-0-local-cublas-performance-update_8.0.61-1_amd64-deb"
# Also be sure to download cuDNN 6.0 for CUDA 8.0 from here: https://developer.nvidia.com/cudnn
# The file should be named cudnn-8.0-linux-x64-v6.0.tgz
Here are the software versions used at the time of this writing:
- Anaconda 5.0.1, Python 3.6. (Check for updates here: https://www.anaconda.com/download/#linux)
- CUDA Toolkit 8.0 GA2 (Feb 2017) and cuBLAS Patch Update to CUDA 8 (Released Jun 26, 2017) – local Debian packages. (Check for updates here: https://developer.nvidia.com/cuda-80-ga2-download-archive)
- cuDNN 6.0 for CUDA 8.0 – local Debian package. Please note that you must join the NVIDIA developer community (free) and download this file from https://developer.nvidia.com/cudnn The filename is cudnn-8.0-linux-x64-v6.0.tgz
Install Anaconda and NVIDIA software
sh "Anaconda3-5.0.1-Linux-x86_64.sh" -b
sudo dpkg -i cuda-repo-ubuntu1604-8-0-local-ga2_8.0.61-1_amd64-deb
sudo dpkg -i cuda-repo-ubuntu1604-8-0-local-cublas-performance-update_8.0.61-1_amd64-deb
sudo apt-get update
sudo apt-get install cuda
tar -zxf cudnn-8.0-linux-x64-v6.0.tgz
sudo cp cuda/lib64/libcudnn* /usr/local/cuda/lib64
sudo cp cuda/include/cudnn.h /usr/local/cuda/include/
sudo chmod a+r /usr/local/cuda/include/cudnn.h /usr/local/cuda/lib64/libcudnn*
Note that we are installing Anaconda for the current user, and the CUDA Toolkit 8.0 using the default path.
Add environmental variables and reboot
echo "export CUDA_HOME=\"/usr/local/cuda\"" >> ~/.bashrc
echo "export LD_LIBRARY_PATH=\"/usr/local/cuda-8.0\":\$LD_LIBRARY_PATH" >> ~/.bashrc
echo "export LD_LIBRARY_PATH=\"/usr/local/cuda-8.0/lib64\":\$LD_LIBRARY_PATH" >> ~/.bashrc
echo "export PATH=\"/usr/local/cuda-8.0/bin:\$PATH\"" >> ~/.bashrc
echo "export PATH=\"$HOME/anaconda3/bin:\$PATH\"" >> ~/.bashrc
sudo reboot
Check if NVIDIA drivers installed correctly
# Enable Nvidia drivers
sudo modprobe nvidia
# check if drivers were installed
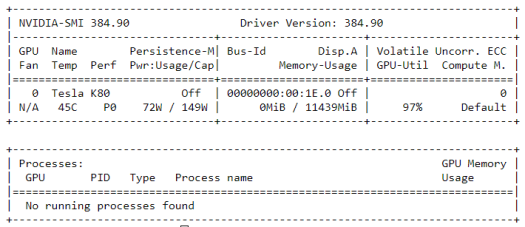
nvidia-smi
You should receive output similar to the following:
 Test building and running CUDA sample code
# Compile and run the deviceQuery sample from the CUDA distribution
cd /usr/local/cuda-8.0/samples/1_Utilities/deviceQuery
sudo make
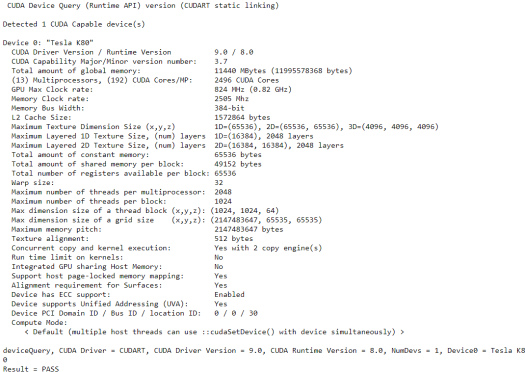
./deviceQuery
You should receive output similar to the following:

Create and activate Anaconda “tensorflow” source
cd $HOME
conda create -n tensorflow python=3.6
source activate tensorflow
Install Tensorflow with GPU support
pip install --ignore-installed --upgrade https://storage.googleapis.com/tensorflow/linux/gpu/tensorflow_gpu-1.4.0-cp36-cp36m-linux_x86_64.whl
Test Tensorflow installation
python
# Enter the following program inside the Python interactive shell
>>> import tensorflow as tf
>>> hello = tf.constant('Hello, TensorFlow!')
>>> sess = tf.Session()
>>> print(sess.run(hello))
# You should see b'Hello Tensorflow!' printed to the terminal
# Exit the shell
exit()
Install Keras, ipkernel (for Jupyter Notebook), and any other python libraries you would like
pip install keras
conda install ipykernel
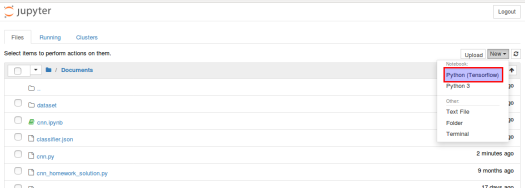
python -m ipykernel install --user --name tensorflow --display-name "Python (Tensorflow)"
source deactivate
Optional: Set up Jupyter Notebook
# configure jupyter and prompt for password
jupyter notebook --generate-config
jupass=`python -c "from notebook.auth import passwd; print(passwd())"`
echo "c.NotebookApp.password = u'"$jupass"'" >> $HOME/.jupyter/jupyter_notebook_config.py
echo "c.NotebookApp.ip = '*'" >> $HOME/.jupyter/jupyter_notebook_config.py
echo "c.NotebookApp.open_browser = False" >> $HOME/.jupyter/jupyter_notebook_config.py
# prompt to start notebook
cd $HOME
# Start jupyter notebook on port 8888 (edit $HOME/.jupyter/jupyter_notebook_config.py if different port is desired)
# If you get an error instead, try restarting your session so your $PATH is updated
jupyter notebook
If you are installing on an instance to which you only have SSH/command-line access (and even if you are not), Jupyter Notebook offers a feature-rich, browser-based interface. (See http://jupyter.org/) Just be sure that your firewall is open to port 8888 (or whichever port you configure it to run on).

Additionally, if you have local or remote access to the GUI then you could also install an IDE such as Spyder – either alone or (my preference) in conjunction with Anaconda Navigator (https://docs.anaconda.com/anaconda/navigator/), an integrated desktop graphical user interface included with Anaconda – which you already installed above. To run Anaconda Navigator, simply open a terminal window and type:
anaconda-navigator

From this screen, select your “tensorflow” environment in the “Applications on” drop-down. Then click the Install button for Spyder.
Appendix
Verifying GPU utilization
To ensure that the GPU is being leveraged, while running your deep learning model, enter:
nvidia-smi
in the terminal to check the GPU utilization. You should see something like this:

Note that, in this example, about 10GB (10964 MB) of GPU memory and 16% of compute is being used by the Tensorflow Anaconda python process.
I hope you have found this setup guide helpful. Did you encounter any issues or have suggestions for improvement?
Let me know in the comments.
